

Setting an out-of-office reply in Outlook ensures that people know you’re not available and won’t expect an immediate response to their emails. Whether you’re going on vacation, attending a conference, or simply need a break from emails, this feature lets you stay professional and communicative. Here’s a complete guide on how to set up your out-of-office message in Outlook, whether you’re using the desktop app or Outlook Web App (OWA).
What is an Out of Office Reply in Outlook?

An out-of-office (OOO) reply is an automatic response sent by your email client when you are away from your inbox. It informs the sender that you are unavailable and provides them with any necessary information, such as your return date or an alternative contact. This feature is vital for managing expectations, especially in a professional environment.
How to Set an Out of Office Reply in Outlook Desktop App
If you’re using the Outlook desktop app, follow these steps to set your out-of-office message:
- Open Outlook and click on File in the top-left corner.
- In the menu that appears, click on Automatic Replies (Out of Office).
- A window will pop up where you can select Send Automatic Replies.
- Optionally, set a time range for when the out-of-office message will be active by selecting Only send during this time range.
- Type your custom message in the text box. Here’s an example of a professional out-of-office message:
- “Thank you for your email. I am currently out of the office and will return on [date]. If your matter is urgent, please contact [colleague’s name] at [email/phone number].”
- Once you’re happy with the message, click OK to activate the out-of-office reply.
How to Set an Out of Office Reply in Outlook Web App (OWA)

If you’re using Outlook Web App (OWA), follow these steps to enable the out-of-office auto-reply:
- Log into Outlook Web App at outlook.com.
- Click on the gear icon in the top-right corner and select View all Outlook settings.
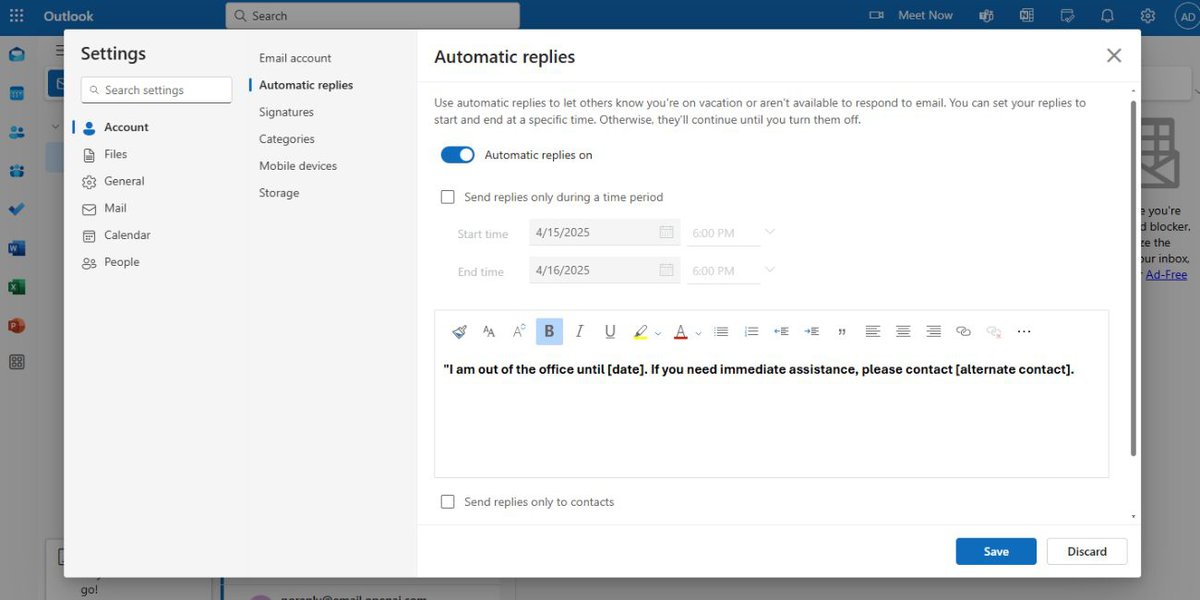
- In the settings menu, go to Mail > Automatic replies.
- Toggle the switch to turn on Automatic replies.
- You can also set a time range for when the out-of-office message will be sent by selecting Send replies only during a time period.
- Enter your custom out-of-office message. You can write something like:
- “I am out of the office until [date]. If you need immediate assistance, please contact [alternate contact].”
- After entering your message, click Save to activate the out-of-office reply.
How to Set a Custom Out-of-Office Message
Customizing your out-of-office message is important to provide relevant information to those who are trying to contact you. Here are some tips for crafting a professional and clear message:
- Mention the dates of absence: Let people know when you’ll be back so they understand the length of your absence.
- Provide an alternative contact: If the matter is urgent, provide a colleague’s name and contact details.
- Keep it polite and concise: You don’t need to write a lengthy message; just enough information for the sender to know when they can expect a reply or whom to contact.
Example message:
- “I am currently out of the office and will return on [date]. If you need immediate assistance, please contact [colleague’s name] at [email or phone number].”
Scheduling Out-of-Office Replies in Advance

If you know you’ll be away in the future, you can schedule your out-of-office replies in advance. This ensures that your auto-reply starts automatically at the correct time, without needing you to manually turn it on.
Here’s how to schedule your out-of-office reply:
- When setting up the Automatic Replies in the desktop app or OWA, you can select a start and end time for when the reply should be sent.
- This ensures that you don’t need to worry about turning it off manually when you return. The system will automatically stop sending the replies once the end time is reached.
How to Turn Off Out-of-Office Reply After Your Return
Once you’re back in the office, don’t forget to disable the out-of-office message. Here’s how:
- Go back to the Automatic Replies settings in either the desktop app or OWA.
- Select Do not send automatic replies to deactivate the out-of-office reply.
- Make sure to save any changes. After this, your auto-reply will stop and people will no longer receive the out-of-office message.
Troubleshooting Out-of-Office Issues
While setting up your out-of-office reply is straightforward, sometimes things may not work as expected. Here are some common issues and how to fix them:
- The auto-reply isn’t being sent: Double-check that the auto-reply feature is enabled in your settings. Make sure the correct account is selected if you manage multiple email addresses in Outlook.
- The reply is sent outside the set time range: Check your time range settings and ensure that the start and end times are correctly set.
- Outlook is not sending your custom message: Confirm that you’ve entered a message in the text box and that there are no issues with your Outlook account.
If you encounter other issues, checking Microsoft’s support page or contacting your IT support team can help resolve specific problems.
Conclusion
Setting an out-of-office reply in Outlook is an easy yet effective way to manage your email communications when you’re away. Whether you’re using the desktop app or Outlook Web App, the process is simple and ensures that your contacts are informed of your absence. Customizing your message, scheduling replies in advance, and turning off the message upon your return are all key steps to ensure smooth communication.
If you found this guide helpful, feel free to share it with others who might need it. And if you have any further questions or tips to share, leave a comment below!